
Note
Go to the end to download the full example code.
Blob Detection#
This example demonstrates blob detection techniques available in Sigima for analyzing circular or blob-like features in images. It shows how to generate apply preprocessing filters and detect blobs using OpenCV-based algorithms with fine-tuned parameters for optimal results.
The script demonstrates image processing workflows commonly used in microscopy, particle analysis, and feature detection applications.
Importing necessary modules#
We start by importing all the required modules for image processing and visualization. To run this example, ensure you have all the required dependencies installed.
import numpy as np
import skimage.draw

import sigima.objects
import sigima.proc.image
from sigima import viz
Generate synthetic test image with known blobs#
We create a synthetic image with a noisy background and several circular blobs of varying sizes and intensities. This allows us to validate the blob detection algorithms effectively. To perform this task, we use a function: the detailes of this is out of the scope of this tutorial: once you have learned how to use Sigima, you will be able to use the library on your own data.
def generate_test_image() -> None:
    """Generate test image with randomly placed blobs."""
    rng = np.random.default_rng(0)
    arr = rng.normal(10000, 1000, (2048, 2048))
    for _ in range(10):
        row = rng.integers(0, arr.shape[0])
        col = rng.integers(0, arr.shape[1])
        rr, cc = skimage.draw.disk((row, col), 40, shape=arr.shape)
        arr[rr, cc] -= rng.integers(5000, 6000)
    icenter = arr.shape[0] // 2
    rr, cc = skimage.draw.disk((icenter, icenter), 200, shape=arr.shape)
    arr[rr, cc] -= rng.integers(5000, 8000)
    data = np.clip(arr, 0, 65535).astype(np.uint16)

    # Create a new image object
    image = sigima.objects.create_image("Test image", data, units=("mm", "mm", "lsb"))
    return image


original_image = generate_test_image()

print("✓ Test image created successfully!")
✓ Test image created successfully!
Visualize the original image#
We visualize the original synthetic image to understand its characteristics before applying any processing or blob detection. This can be done with your preferred image viewer (i.e. plotpy, matplotlib, …). The preference of Sigima developers is on plotpy, a library developed with performance in mind.
We wrapped a simple function to do perform visualizations tasks required for this and other tutorials, to help reducing the impact of GUI code in documentation and let you concentrate in the analysis
viz.view_images([original_image], title="Original Test Image with Synthetic Blobs")
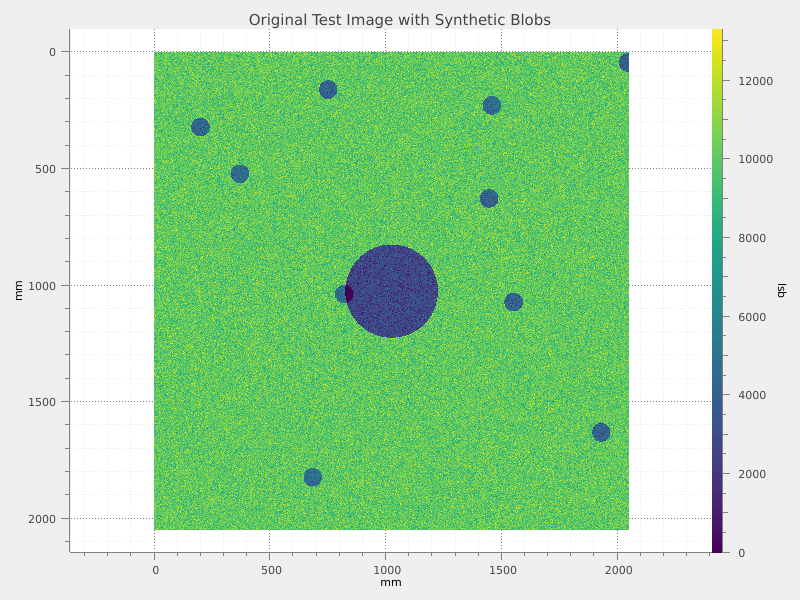
Image preprocessing - Binning#
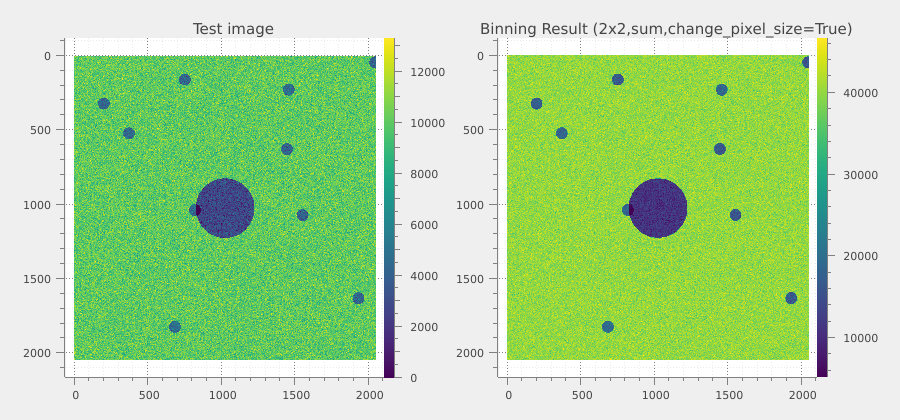
Looking to our image, we can see that the blobs we look for are large respect to the pixel size. A binning process can help to reduce the importance of the noise.
binning_factor = 2
binned_image = sigima.proc.image.binning(original_image, binning_factor)

print(f"\n✓ Binning applied with factor {binning_factor}")
print(f"Original size: {original_image.data.shape}")
print(f"Binned size: {binned_image.data.shape}")
print("Binning reduces computational load and can improve blob detection")

# Compare original and binned images
viz.view_images_side_by_side(
    [original_image, binned_image],
    titles=["Original Image", "Binned Image (2x2)"],
    title="Image Binning Comparison",
)
✓ Binning applied with factor 2
Original size: (2048, 2048)
Binned size: (1024, 1024)
Binning reduces computational load and can improve blob detection
Additional preprocessing - Moving median filter#
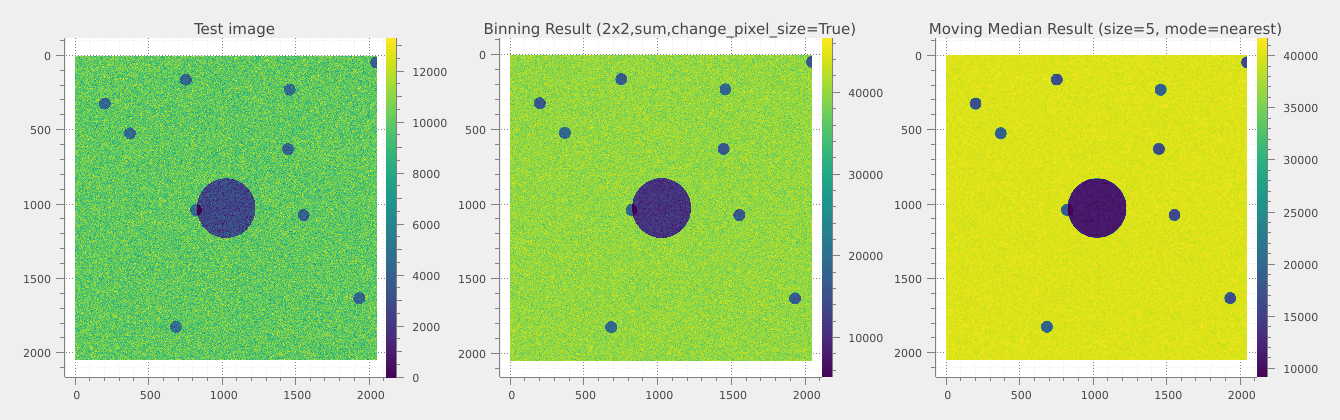
The result of the binning is good, but we can imagine to not be happy with that. A different approach we can take is to apply a moving median filter, to reduce the importance of the spikes. We do it with a window of 5, of curse in practice different window sizes can be tested to find the good compromise between noise reduction and resolution. Lets see how to do that.
filter_size = 5
filtered_image = sigima.proc.image.moving_median(binned_image, n=filter_size)

print(f"\n✓ Moving median filter applied (window size: {filter_size})")

# Show progression of preprocessing steps
viz.view_images_side_by_side(
    [original_image, binned_image, filtered_image],
    titles=["Original", "Binned", "Median Filtered"],
    title="Image Preprocessing Pipeline",
)
✓ Moving median filter applied (window size: 5)
Configure blob detection parameters#
We are happy with the filtered image, we can now proceed to the blob detection. First of all we need to configure the parameters of the detection algorithm: this is very important to get good results. In this example, you find an overview of the parameters that can be tuned.
Create blob detection parameter object:
blob_param = sigima.proc.image.BlobOpenCVParam()
Threshold parameters for blob detection:
blob_param.min_threshold = 10
blob_param.max_threshold = 200
Minimum repeatability (how many times a blob center is detected):
Color filtering (not used for grayscale):
blob_param.filter_by_color = False
Area filtering to select appropriate blob sizes:
blob_param.filter_by_area = True
blob_param.min_area = 600.0  # Minimum area in pixels
blob_param.max_area = 6000.0  # Maximum area in pixels
Circularity filtering to prefer round objects:
blob_param.filter_by_circularity = True
blob_param.min_circularity = 0.8  # 0 = not circular, 1 = perfect circle
blob_param.max_circularity = 1.0
Disable inertia and convexity filtering for this example:
blob_param.filter_by_inertia = False
blob_param.filter_by_convexity = False
We finally print configured parameters:
print("\n✓ Blob detection parameters configured:" + "\n")
print(blob_param)
✓ Blob detection parameters configured:

Blob detection using OpenCV:
    _roi_g:
      Create regions of interest: ☐
      ROI geometry: Rectangle
    Min. threshold: 10.0
    Max. threshold: 200.0
    Min. repeatability: 2
    Min. distance between blobs: 10.0
    Filter by color: ☐
    Blob color: 0
    Filter by area: ☑
    Min. area: 600.0
    Max. area: 6000.0
    Filter by circularity: ☑
    Min. circularity: 0.8
    Max. circularity: 1.0
    Filter by inertia: ☐
    Min. inertia ratio: 0.6
    Max. inertia ratio: 1.0
    Filter by convexity: ☐
    Min. convexity: 0.8
    Max. convexity: 1.0
Perform blob detection#
We can now perform the blob detection on the preprocessed image using the configured parameters.
# Detect blobs in the preprocessed image
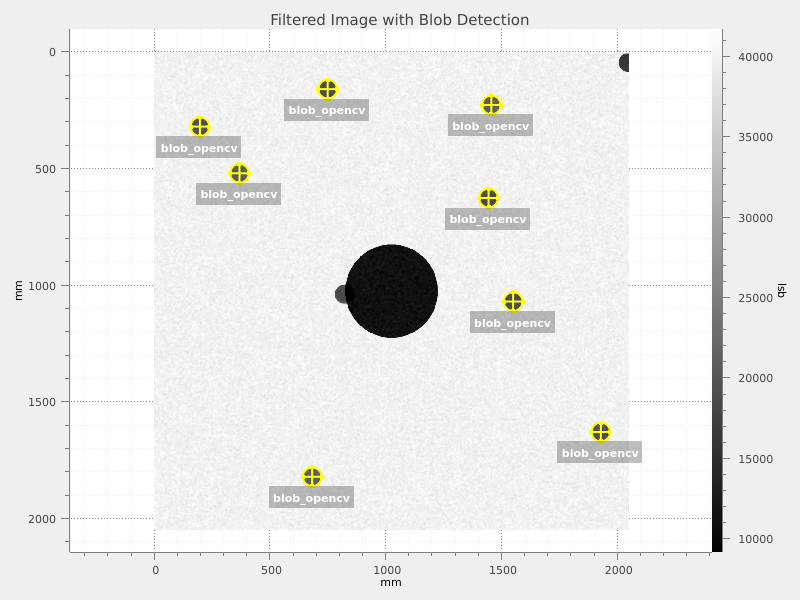
blobs = sigima.proc.image.blob_opencv(filtered_image, blob_param)
print("\n✓ Blob detection completed!")
print(f" Number of blobs detected: {len(blobs.coords) if blobs else 0}")
viz.view_images(
[filtered_image],
title="Filtered Image with Blob Detection",
results=blobs,
colormap="gray",
)
✓ Blob detection completed!
  Number of blobs detected: 8
We print the detected blobs and their properties:
if blobs and len(blobs.coords) > 0:
    blobs_df = blobs.to_dataframe()
    print("\nDetected blobs data frame:")
    print(blobs_df)

else:
    print("No blobs detected. Consider adjusting detection parameters.")
Detected blobs data frame:
   roi_index            x            y          r
0         -1  1929.505005  1629.516724  40.535240
1         -1  1550.487915  1070.406860  40.601971
2         -1  1444.442627   626.465759  40.596977
3         -1   197.523972   320.457184  40.515938
4         -1   749.518250   159.622253  40.518841
5         -1   368.359985   520.453979  40.556187
6         -1  1456.451782   227.557236  40.577053
7         -1   682.408081  1821.558105  40.533581